
Key Takeaways
Langstroth hives are the most popular and beginner-friendly beehive design.
They are modular, making them easy to expand and manage.
All essential components and tools are widely available and affordable.
Regular inspections and proper site preparation are key to successful beekeeping.
Understanding hive anatomy and setup ensures a healthy and productive bee colony.
Langstroth Hive Setup Guide & Best Practices for Beginners

“The Langstroth Beehive …” from www.perfectbee.com
Why Choose a Langstroth Hive
When starting out in beekeeping, choosing the right hive is crucial. The Langstroth hive, invented by Rev. Lorenzo Langstroth in 1852, is the go-to choice for many beekeepers worldwide. Its design is simple yet highly effective, allowing for easy inspection and management of the bee colony.
One of the biggest advantages of the Langstroth hive is its modularity. This means you can easily add or remove boxes (called supers) to adjust the size of the hive based on the needs of your bee colony. Moreover, because it is so popular, you will find plenty of resources, equipment, and community support to help you succeed.
Understanding Langstroth Hive Anatomy
Before diving into the setup, it’s essential to understand the main components of a Langstroth hive. This will not only help you during the assembly but also make it easier to manage the hive effectively.
A typical Langstroth hive consists of the following parts:
Hive Stand: Elevates the hive to protect it from moisture and pests.
Bottom Board: The floor of the hive, which can be solid or screened.
Brood Boxes: The main living space for the bees, where the queen lays eggs.
Honey Supers: Additional boxes added on top for honey storage.
Frames: Removable structures that hold the beeswax foundation.
Inner Cover: Provides insulation and ventilation.
Outer Cover: Protects the hive from weather conditions.
Benefits of Using a Langstroth Hive
Ease of Management
The Langstroth hive’s design allows for straightforward inspection and maintenance. You can easily remove and replace frames, making it simple to check on the health of your bees and manage pests. This ease of access is especially important for beginners who are still learning the ropes of beekeeping.
Availability of Resources
Because the Langstroth hive is so widely used, you will have no trouble finding the equipment and materials you need. From beekeeping supply stores to online retailers, everything you require is readily available. Additionally, most beekeeping books, videos, and forums focus on Langstroth hives, providing a wealth of information at your fingertips.
Hive Modularity
One of the standout features of the Langstroth hive is its modularity. You can start with a basic setup and expand as your colony grows. Adding more brood boxes or honey supers is a breeze, allowing your hive to adapt to the changing needs of your bees.
“The modularity of Langstroth hives allows for easy expansion and customization, making them perfect for both beginners and experienced beekeepers.” – Apiary Book Blog
Materials Needed for a Langstroth Hive Setup
Setting up a Langstroth hive requires specific materials and tools. Here’s a detailed list to get you started:
For those interested in alternative bee housing options, you might find this guide to wooden bee houses useful as well.
Tools for Assembly
Having the right tools will make the assembly process much smoother. Here’s what you’ll need:
Hammer or screwdriver (depending on whether you use nails or screws)
Measuring tape
Square
Hand saw or circular saw
Paint or wood preservative (optional)
Hive Components
|
Component |
Description |
|---|---|
|
Hive Stand |
Elevates the hive to protect it from moisture and pests. |
|
Bottom Board |
The floor of the hive, which can be solid or screened. |
|
Brood Boxes |
The main living space for the bees, where the queen lays eggs. |
|
Honey Supers |
Additional boxes added on top for honey storage. |
|
Frames |
Removable structures that hold the beeswax foundation. |
|
Inner Cover |
Provides insulation and ventilation. |
|
Outer Cover |
Protects the hive from weather conditions. |

“Hive components | Geelong Beekeepers Club” from geelongbeekeepersclub.org.auons.
Understanding these components will help you assemble and manage your Langstroth hive more effectively. Each part plays a critical role in the overall health and productivity of your bee colony.
For example, the hive stand keeps the hive off the ground, reducing moisture and pest problems. The bottom board serves as the hive’s floor, and you can choose between a solid or screened option based on your needs. The brood boxes are where the queen lays eggs and the colony lives, while the honey supers are where the bees store their honey. For those interested in additional housing options, check out this guide on wooden bee houses.
Frames hold the beeswax foundation, which is essential for the bees to build their comb. The inner cover provides insulation and helps with ventilation, and the outer cover protects the hive from the elements. For more insights, you can explore this guide on observing bee behavior.
Step-by-Step Setup Guide
Now that you have all the materials and tools ready, let’s dive into the step-by-step setup guide for your Langstroth hive.
Preparing the Site
Choosing the right location for your hive is crucial for the health and productivity of your bees. Look for a spot that gets plenty of sunlight, has good air circulation, and is protected from strong winds. Avoid placing the hive near areas with high foot traffic or close to animals that might disturb the bees.
Ensure the ground is level and free of debris. You can place the hive on a stand or cinder blocks to elevate it, which helps with ventilation and keeps pests at bay. Make sure the entrance faces southeast to take advantage of the morning sun, which encourages the bees to start foraging early.
Building the Hive Body
Start by assembling the bottom board. If you’re using a screened bottom board, ensure the screen is securely attached to prevent pests from entering. Next, assemble the brood boxes by nailing or screwing the sides together. Use wood glue for added strength.
Once the brood boxes are assembled, attach the frames. Insert the foundation into the frames, making sure they are secure. Place the frames into the brood boxes, evenly spaced. Repeat the process for the honey supers, which will sit on top of the brood boxes.
Installing Frames and Foundation
Frames are the backbone of your hive, providing structure for the bees to build their comb. Insert the beeswax foundation into each frame, ensuring it’s centered and secure. This foundation acts as a guide for the bees, helping them build straight combs.
Place the frames into the brood boxes, leaving a small gap between each one. This spacing is crucial for proper bee movement and ventilation. As you add more boxes, continue to place frames in the same manner.
Positioning the Hive
Once the hive body is assembled and the frames are in place, it’s time to position the hive in your chosen location. Follow these steps:
Place the hive stand or cinder blocks on the leveled ground.
Set the bottom board on top of the stand.
Place the brood boxes on the bottom board, starting with one box and adding more as needed.
Add the honey supers on top of the brood boxes.
Place the inner cover on top of the last box.
Finish with the outer cover to protect the hive from weather.
Make sure the hive is stable and level. Check that the entrance faces southeast to take advantage of the morning sun. Finally, ensure there is enough space around the hive for you to move and work comfortably.
Best Practices for Langstroth Hive Management
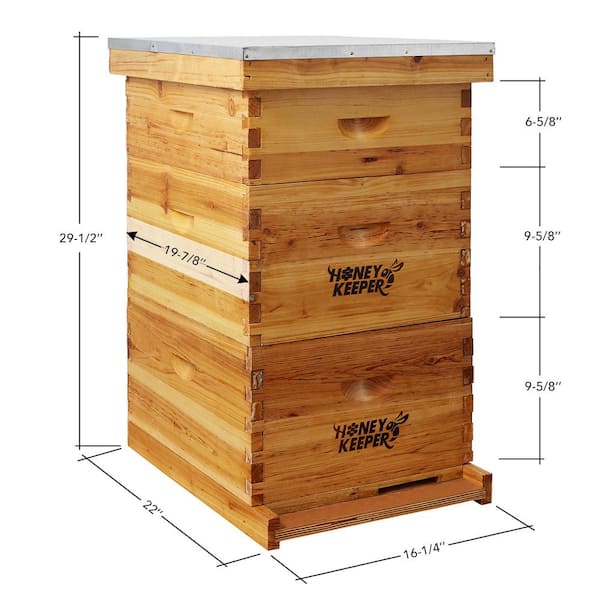
“Wood Langstroth Beehive BEE-HIVE-310 …” from www.homedepot.com
Now that your hive is set up, it’s essential to follow best practices for hive management. This will ensure your bees stay healthy and productive.
Regular Inspections
Regular inspections are crucial for maintaining a healthy hive. Aim to inspect your hive every 7-10 days during the active season. This helps you monitor the colony’s health, check for pests and diseases, and ensure the queen is laying eggs.
“Regular inspections help you catch problems early and take corrective action before they become serious issues.” – Apiary Book Blog
During inspections, look for signs of brood (eggs, larvae, and pupae), check the honey and pollen stores, and look for any signs of pests or diseases. If you notice anything unusual, take action immediately to address the issue.
Pest and Disease Control
Pests and diseases can quickly devastate a bee colony if not managed properly. Common pests include varroa mites, small hive beetles, and wax moths. Regular inspections and preventive measures can help keep these pests under control.
For example, using screened bottom boards can help reduce varroa mite infestations. Additionally, consider using natural treatments like essential oils or powdered sugar dusting to manage pests. Always monitor the effectiveness of any treatment and adjust as needed. For more information, check out this beginner beehive guide.
Honey Harvesting Techniques
Harvesting honey is one of the most rewarding aspects of beekeeping. To do it properly, follow these steps and consider using smart hive management solutions to enhance your beekeeping experience.
Wait until the honey supers are full and the honey is capped (covered with a wax seal).
Use a bee escape or fume board to clear the bees from the honey supers.
Remove the frames and use an uncapping knife to remove the wax seals.
Place the frames in an extractor to spin out the honey.
Filter the honey to remove any debris.
Bottle the honey and store it in a cool, dry place.
Always leave enough honey for the bees to sustain themselves, especially going into winter. A general rule is to leave at least 60-80 pounds of honey for the colony. For more insights, check out our Cedar Bee House guide.
Winterizing the Hive
As winter approaches, it’s crucial to prepare your Langstroth hive to ensure your bees survive the cold months. Start by ensuring the hive has adequate honey stores. Bees need around 60-80 pounds of honey to make it through the winter.
Next, reduce the hive entrance to keep out cold drafts and prevent pests from entering. You can use an entrance reducer or a piece of wood to accomplish this. Additionally, consider adding an insulation board on top of the inner cover to help retain heat.
It’s also a good idea to tilt the hive slightly forward to allow any moisture to drain out. Excess moisture can be deadly for bees in the winter. Finally, wrap the hive in a breathable insulation material if you live in an area with harsh winters.
Troubleshooting Common Issues
Even with the best care, you may encounter some common issues in your Langstroth hive. Knowing how to troubleshoot these problems can save your colony. For advanced solutions, you might consider exploring smart hive management tools.
Dealing with Swarming
Swarming occurs when the colony becomes overcrowded, and the bees decide to split, taking the queen and half the colony with them. To prevent swarming, regularly check for signs of overcrowding and add more brood boxes or honey supers as needed. For those interested in learning more about bee behavior, consider reading about observing bee behavior in cedar bee houses.
If you notice swarm cells (large, peanut-shaped cells) on the frames, it’s a sign that the bees are preparing to swarm. You can manage this by performing a split, which involves dividing the colony into two separate hives, giving each a queen or queen cell. For more insights on observing bee behavior, check out our article on Cedar Bee House Insights.
Addressing Poor Honey Production
If your hive isn’t producing enough honey, there could be several reasons. First, ensure the hive is in a location with plenty of forage. Bees need access to flowers to collect nectar and pollen.
Next, check the health of the queen. A failing queen can lead to a weak colony that struggles to produce honey. If needed, replace the queen with a new, healthy one. Also, monitor for pests and diseases, as these can significantly impact honey production.
Identifying and Treating Diseases
Bees can be affected by various diseases, such as American foulbrood, European foulbrood, and Nosema. Regular inspections will help you catch these diseases early. Look for signs like discolored or sunken brood cells, unusual odors, or sluggish bees.
Treating diseases often involves removing and destroying infected frames, improving hive hygiene, and sometimes using medications. Always follow best practices and consult with local beekeeping associations or experts for guidance.
Conclusion
Setting up and managing a Langstroth hive may seem daunting at first, but with the right knowledge and tools, you can become a successful beekeeper. Remember, the key is to start with a solid foundation, regularly inspect and maintain your hive, and be proactive in addressing any issues that arise.
Final Thoughts and Recommendations
Beekeeping is a rewarding and fulfilling hobby that not only benefits you but also the environment. By following this guide, you’ll be well on your way to establishing a thriving bee colony. Always stay curious and continue learning, as beekeeping is a journey filled with continuous discovery.
Frequently Asked Questions (FAQ)
How often should I inspect my Langstroth hive?
During the active season, aim to inspect your hive every 7-10 days. This helps you monitor the colony’s health, check for pests and diseases, and ensure the queen is laying eggs. In the winter, inspections can be less frequent, but still check periodically to ensure the hive is secure and the bees have enough food.
What is the best way to prevent swarming?
Preventing swarming involves managing the hive’s space and population. Regularly add more brood boxes or honey supers to provide ample space for the colony. Additionally, monitor for swarm cells and perform splits if necessary to reduce overcrowding.
How do I know when to harvest honey?
Harvest honey when the frames in the honey supers are full and the honey is capped (covered with a wax seal). This indicates that the honey is ripe and ready for extraction. Always leave enough honey for the bees to sustain themselves, especially before winter.
By following these guidelines and best practices, you’ll be well-equipped to manage your Langstroth hive and enjoy the sweet rewards of beekeeping. Happy beekeeping!
Setting up a Langstroth hive for the first time can be an exciting yet challenging experience. It’s important to select the right location, assemble the hive components correctly, and ensure the bees have a suitable environment. For those looking to diversify their beekeeping practices, consider exploring setting up your first Mason bee house as well.




Leave a Reply