
Key Takeaways
Urban Warre hives are ideal for city environments due to their compact size and simple management.
Building a Warre hive requires basic tools and materials, making it accessible for beginners.
Proper placement of your hive in an urban setting is crucial for bee health and community safety.
Regular maintenance and inspections help ensure the health of your hive and prevent diseases.
Urban beekeeping supports local ecosystems and can increase community awareness about the importance of bees.

“HIVE: What is a “Warre Bee Hive …” from grossmannsbees.wordpress.com
Urban Warre Hive Building: Crafty Beekeeping Experience & Guide
Why Choose a Warre Hive for Urban Beekeeping
When it comes to urban beekeeping, the Warre hive stands out as a top choice. This hive, pronounced “war-ray,” is a vertical top-bar hive that’s both easy to build and manage. Most importantly, it’s designed to mimic the natural living conditions of bees, making it a sustainable option. For more insights on sustainable practices, check out this article on mason bee conservation.
Warre hives are smaller than the traditional Langstroth hives, which makes them perfect for city environments where space is limited. They consume fewer resources and are less intrusive, fitting well into urban backyards and rooftops. Besides that, their simple design and minimal management requirements make them accessible even for beginners.
Materials and Tools Needed
Before you start building your Warre hive, gather all the necessary tools and materials. This ensures a smooth construction process.
Essential Tools
For urban beekeepers, understanding the necessary equipment is crucial. From protective gear to hive tools, having the right beekeeping essentials ensures a safe and productive beekeeping experience.
Hand saw or circular saw
Hammer
Nails or screws
Measuring tape
Wood glue
Chisel
Drill
Materials List
Wood planks (cedar or pine are good choices)
Wire mesh
Canvas or breathable fabric
Insulation material (like straw or wood shavings)
Non-toxic paint or wood preservative
How to Build Your Warre Hive
Now that you have your tools and materials ready, it’s time to get started on building your Warre hive. Follow these steps carefully to ensure a sturdy and functional hive.
Step-by-Step Construction Guide
Building a Warre hive can be a rewarding experience for urban beekeepers. To ensure a smooth process, it’s essential to follow a detailed construction guide. Additionally, understanding hive law for city beekeepers can help you navigate any legal challenges you might face.
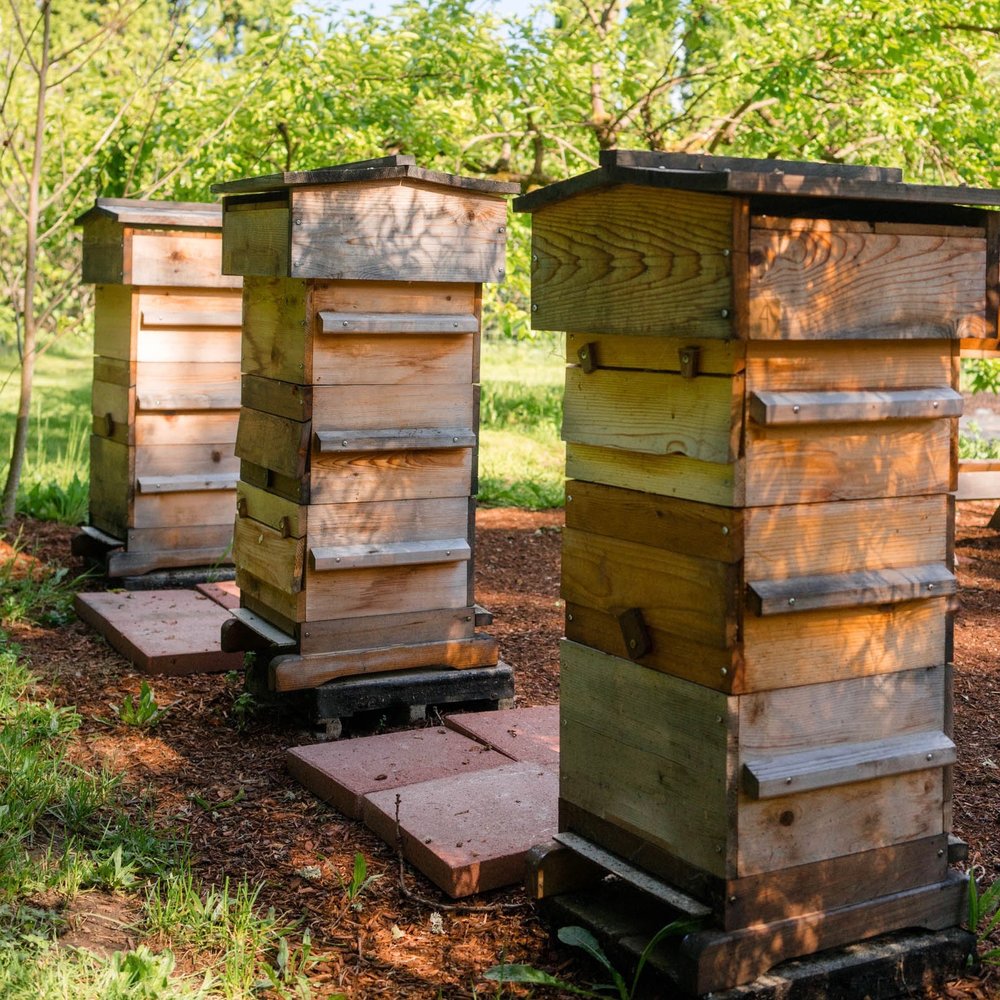
“Natural Beekeeping with the Warre Hive …” from iuhoakland.com
Building the Floor
The floor of the Warre hive is crucial as it provides the foundation for the entire structure. Begin by cutting a wooden plank to the desired size of your hive’s base. Attach wire mesh to the bottom to allow for ventilation while keeping pests out.
Next, secure the sides of the floor using nails or screws. Make sure the corners are tightly joined to prevent any gaps. Applying wood glue along the edges can provide extra strength. For a step-by-step guide on creating a bee house, check out this DIY mason bee house project.
Constructing the Hive Box
The hive box is where the bees will live and store their honey. Cut your wood planks into equal-sized panels for the sides of the box. Assemble these panels into a square or rectangular shape, ensuring the edges are flush.
Use nails or screws to secure the sides together. For added durability, apply wood glue along the joints. Once the main structure is assembled, drill a small entrance hole near the bottom of one side. This allows bees to enter and exit the hive. For more tips on beekeeping, check out this beginner beekeeper guide.
Building the Roof
The roof protects the hive from weather elements. Cut wood planks to form a sloping roof that fits snugly over the hive box. Attach the pieces together using nails or screws, and ensure there’s an overhang to direct rainwater away from the hive. For more detailed instructions, you can refer to this Warre Style guide.
Cover the roof with a waterproof material, such as metal sheeting or shingles. This helps prolong the life of your hive by preventing water damage.
Creating the Quilt Box
The quilt box sits just below the roof and provides insulation for the hive. It’s filled with breathable material like straw or wood shavings to help regulate the hive’s temperature and humidity. For more details on hive construction, you can refer to this Warre Hive Construction Guide.
Cut wood planks to form a shallow box that fits on top of the hive box.
Attach a breathable fabric, like canvas, to the bottom of the quilt box.
Fill the box with insulation material and secure it in place.
Once the quilt box is complete, place it on top of the hive box and cover it with the roof. Your Warre hive is now ready for installation.
Installing Your Warre Hive in an Urban Environment
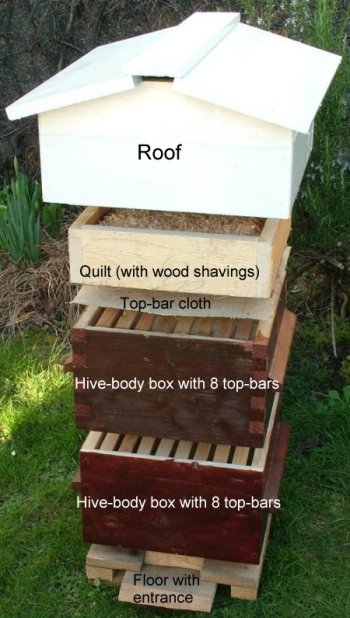
“Warre Hive | The Bee Space” from thebeespace.net
When installing your Warre hive in an urban environment, it’s essential to consider space-saving solutions. One innovative approach is utilizing the Flow Hive’s role in urban beekeeping, which can help maximize your available space while maintaining a healthy bee colony.
Setting up your Warre hive in an urban environment requires careful consideration. The location you choose can significantly impact the health of your bees and the safety of your community.
Choosing the Right Location
Choosing the right location for your Warre hive in an urban environment is crucial. Ideally, you want a spot that gets plenty of sunlight but is also sheltered from strong winds. A sunny location helps keep the hive warm, while shelter from the wind prevents the hive from getting too cold or damaged.
Ensure the hive is placed on a level surface to prevent it from tipping over. You can use bricks or a wooden stand to elevate the hive, which helps with ventilation and keeps pests at bay. Additionally, position the hive away from high-traffic areas to minimize disturbances to the bees and reduce the risk of stings. For more information on urban beekeeping, check out this beginner’s journey guide.
Setting Up the Hive
Once you’ve chosen the perfect spot, it’s time to set up your Warre hive. Start by placing the floor on the chosen surface. Make sure it’s stable and level. Next, stack the hive boxes on top of the floor. Align the boxes carefully to ensure they fit snugly together.
Place the quilt box on top of the hive boxes, followed by the roof. The quilt box provides insulation, while the roof protects the hive from rain and other weather elements. Double-check that all components are securely in place and that there are no gaps where pests can enter. For more details on construction, check out this Warre Hive Construction Guide.
Introducing Bees to Your Hive
Introducing bees to your Warre hive can be an exciting moment. The best time to do this is in the spring when flowers are blooming, and nectar is abundant. You can purchase a package of bees or a nucleus colony (nuc) from a reputable supplier.
Open the hive and remove a few frames to create space for the bees.
Gently shake the bees into the hive, ensuring the queen is safely inside.
Replace the frames and close the hive, allowing the bees to settle in.
Provide a sugar syrup feeder to help the bees get established.
After introducing the bees, give them some time to acclimate to their new home. Avoid opening the hive too frequently, as this can stress the bees and disrupt their activities. For more tips, check out this beginner’s journey into urban beekeeping.
Maintaining and Caring for Your Warre Hive
Regular maintenance and care are essential for the health and productivity of your Warre hive. By keeping a close eye on your hive, you can catch potential issues early and ensure your bees thrive.
Regular Inspections
Performing regular inspections helps you monitor the health of your hive and identify any problems. Aim to inspect your hive every two weeks during the active season. Look for signs of disease, pests, and the overall condition of the hive.
During inspections, check for the presence of the queen, brood patterns, and honey stores. Healthy brood patterns indicate a strong queen, while ample honey stores ensure the colony has enough food. If you notice any issues, take immediate action to address them. For more detailed advice, refer to our quick fixes for common bee problems.
Wear protective gear to avoid stings.
Use a smoker to calm the bees before opening the hive.
Inspect each frame carefully, looking for signs of disease or pests.
Take notes on the hive’s condition and any actions taken.
Managing Pests and Diseases
Pests and diseases can pose significant threats to your hive. Common pests include Varroa mites, wax moths, and small hive beetles. Diseases such as American foulbrood and European foulbrood can also affect your bees.
To manage pests and diseases, maintain good hive hygiene and monitor your bees regularly. Use integrated pest management (IPM) techniques, such as screened bottom boards and drone comb removal, to control pest populations. If you detect a disease, consult a beekeeping expert for guidance on treatment options.
Harvesting Honey
For those interested in urban beekeeping, the Warré Beehive offers a sustainable and efficient way to harvest honey. This method is particularly suitable for beginners and those with limited space.
Harvesting honey from your Warre hive is a rewarding experience. The best time to harvest is in late summer or early fall when the bees have had ample time to collect nectar and produce honey.
Begin by removing the top hive box, which should be filled with capped honey. Use a bee brush to gently remove any bees from the frames. Extract the honey using a honey extractor or crush and strain method. Be sure to leave enough honey for the bees to sustain themselves through the winter. For more detailed beekeeping tips, check out this Mason Bee Lifecycle Guide.
After harvesting, clean the frames and return them to the hive. This allows the bees to reuse the comb and reduces their workload for the next season. For more detailed instructions, check out this Warre Hive Construction Guide.
Community and Environmental Impact
Urban beekeeping offers numerous benefits to both the environment and the community. By keeping bees in the city, you contribute to the pollination of local plants and support biodiversity. Bees play a crucial role in pollinating flowers, fruits, and vegetables, which helps maintain healthy ecosystems.
Besides that, urban beekeeping raises awareness about the importance of bees and the challenges they face. Sharing your beekeeping journey with neighbors and community members can inspire others to take action in support of pollinators. For more insights, check out this beginner’s guide to urban beekeeping.
Benefits to the Urban Environment
Urban beekeeping helps create green spaces in cities and promotes environmental sustainability. Bees contribute to the growth of gardens, parks, and other green areas by pollinating plants. This enhances the beauty of urban landscapes and supports local wildlife.
Moreover, keeping bees in the city can improve air quality and reduce pollution. Plants that bees pollinate help absorb carbon dioxide and produce oxygen, contributing to a healthier urban environment.
Community Awareness and Engagement
Engaging with your community about urban beekeeping can foster a sense of connection and shared responsibility for the environment. Host workshops, participate in local events, and share your experiences through social media to spread awareness about the importance of bees.
By educating others about sustainable beekeeping practices, you can inspire more people to take up beekeeping or support initiatives that protect pollinators. This collective effort can have a significant positive impact on the environment and the health of bee populations.
Final Takeaways
To enhance your urban beekeeping experience, it is essential to integrate practices that promote harmony within your community. Learn more about bee-kind neighbor integration and its benefits.
Summarizing Key Points
Building and maintaining a Warre hive in an urban environment is a fulfilling and impactful endeavor. By choosing a Warre hive, you support sustainable beekeeping practices that benefit both the bees and the environment. Remember to carefully select the location for your hive, perform regular inspections, and manage pests and diseases to ensure the health of your colony.
Urban beekeeping not only supports local ecosystems but also raises community awareness about the importance of bees. By sharing your journey and engaging with others, you can inspire positive change and contribute to a healthier environment.
Encouragement for Urban Beekeepers
If you’re considering starting an urban Warre hive, take the plunge and join the growing community of urban beekeepers. Your efforts can make a significant difference in supporting pollinators and promoting environmental sustainability. Happy beekeeping!
Frequently Asked Questions (FAQ)
How much time does it take to maintain a Warre hive?
Maintaining a Warre hive typically requires about 1-2 hours per week during the active season. This includes regular inspections, feeding, and addressing any issues that arise. For more detailed guidance, check out this weekly beekeeping maintenance checklist. During the winter, maintenance time decreases significantly.
What are the main benefits of using a Warre hive?
Warre hives are designed to mimic natural bee habitats, which supports the health and well-being of the colony. They are easy to build and manage, making them accessible for beginners. Additionally, their compact size is ideal for urban environments.
Is urban beekeeping legal in my city?
Urban beekeeping regulations vary by city. It’s important to check with your local government or beekeeping association to understand the rules and requirements in your area. Some cities may require permits or have specific guidelines for hive placement.
How do I handle bee stings and allergies?
Handling bee stings and allergies can be challenging for many beekeepers. It’s important to know the right steps to take immediately after a sting, such as removing the stinger and applying a cold compress. For those with severe allergies, carrying an epinephrine injector is crucial. Additionally, learning about how to integrate bees into urban settings can help minimize conflicts and reduce the risk of stings.
If you get stung, remove the stinger immediately by scraping it out with a fingernail or a credit card. Apply a cold compress to reduce swelling and take an antihistamine if needed. If you have a severe allergic reaction, seek medical attention immediately. It’s a good idea to have an epinephrine auto-injector (EpiPen) on hand if you’re allergic to bee stings.
What should I do if my hive swarms?
If your hive swarms, it’s important to stay calm and take appropriate measures. Swarming is a natural process for bees, but it can be managed with proper techniques. You might want to consider reading about urban beekeeping to better understand how to handle such situations.
If your hive swarms, it means the colony has decided to split and form a new hive. Swarming is a natural process, but it can be alarming. Try to capture the swarm by placing a new hive box nearby and gently guiding the bees into it. If you’re unsure how to handle a swarm, contact a local beekeeper or beekeeping association for assistance.
By following these guidelines and staying informed about best practices, you can enjoy a successful and fulfilling experience as an urban beekeeper. Happy beekeeping!




Leave a Reply